
Stage Guides
| Noah's Park |
|---|
 Throughout Noah's Park you'll periodically switch between the three Hunters, so you'll have ample chance to try out the handling of each one. The stage itself will also give you a relaxed chance to get comfortable with the platforming system. You'll begin the stage with X & Axl. Once you've got control begin moving through the jungle. Throughout Noah's Park you'll periodically switch between the three Hunters, so you'll have ample chance to try out the handling of each one. The stage itself will also give you a relaxed chance to get comfortable with the platforming system. You'll begin the stage with X & Axl. Once you've got control begin moving through the jungle.Take down the small bees floating around with single shots, they'll go down easily. Grab the Metals they drop and continue on. Cross the river and watch out for the missile-launching Reploid on the opposite side, charged shots work well but watch out for fish if using the river for cover. You'll encounter more missile-launchers and bees further on, as well as a small Bulbrite attaching itself to a bee. Bulbrites tend to float around and don't present much of a threat themselves, but if they attach to a fellow ally, they'll enhance its strength and defense (indicated by the purple aura). But this group of enemies shouldn't pose a threat, blast them all and grab the Metals they scatter before moving on. Down the path you'll experience a few earth tremors before discovering the reason why the Hunters came on this safari - a giant Maverick resembling a crab will emerge from the foliage and challenge you.  Alia will hint at the crab's main attack - it'll often try to grab and immobolize you. If you're ever caught out by it quickly call in Axl to break its grip. Watch out for the steady stream of small energy blasts it emits from the two blue bulbs on its legs. Aim for the crab's head and you'll know you've hit home when the entire body flashes red. Keep berating the head with charged shots, eventually the crab will move backwards (the screen will automatically push you along with it) then watch out as it launches a claw off the left side of the screen. Alia will hint at the crab's main attack - it'll often try to grab and immobolize you. If you're ever caught out by it quickly call in Axl to break its grip. Watch out for the steady stream of small energy blasts it emits from the two blue bulbs on its legs. Aim for the crab's head and you'll know you've hit home when the entire body flashes red. Keep berating the head with charged shots, eventually the crab will move backwards (the screen will automatically push you along with it) then watch out as it launches a claw off the left side of the screen.Stick close to the crab as the claw will reappear on the left edge and snap away trying to grab you. Remember to call in Axl if you're caught to break free. After enough hits to the face the crab will violently shake while spewing out droves of blue Metals before promptly retreating off the screen. Grab all the Metals it expels and proceed on. Up ahead at the end of the jungle region X returns to the Hunter Base, leaving Axl in charge. With Axl in command you'll be standing at the edge of a cliff. Waste the three bats flying towards you, then drop down to the edge of the precipice. Respond to Alia's call and she'll tell you to hover over the large pit to the other side. Jump as high as the Metals floating over the pit, then press Jump again and hold it down to hover in the air. Float over to the right edge and move on. Blast the small crabs scuttling about and watch out for more missile-launcher & bee combos beyond the waterfall. Take it easy around the next waterfall as you'll be assaulted by suicide fish launching from the background and keep charging through the missile-launchers to find a large door leading inside a mountain. 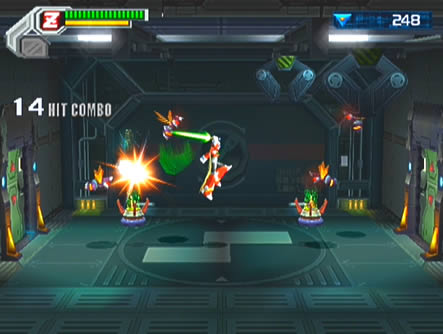 Inside you'll find a small cave where wave after wave of triple-bat formations attack. Stay beside the door you entered via and spray the air with fire to easily score a hit on each wave. You should be able to score a combo around the range of 50-60 before the waves end. With all the bats taken out a range of Metals, Weapon, Energy & Double Attack refills will appear. Inside you'll find a small cave where wave after wave of triple-bat formations attack. Stay beside the door you entered via and spray the air with fire to easily score a hit on each wave. You should be able to score a combo around the range of 50-60 before the waves end. With all the bats taken out a range of Metals, Weapon, Energy & Double Attack refills will appear.You'll find a range of rooms like this throughout the game, with each rewarding you with items once cleared. Grab the items and exit the room. Outside you'll be greeted by Zero before he takes point. With Zero in command, head right and drop down to the base of the next waterfall (note that Noah's Park RM#02 hides out near here). Once at the base of the falls the giant crab will greet you again from behind the falls (watch out for its ever-present binding claw attack). Small crabs will also pour out from the falls, note that every one drops a Double Attack refill. Slash at the crab's head when it emerges from the falls to inflict damage, and keep an eye on your Attack gauge. Eventually Alia will strongly advise that you use the Double Attack, so once you're ready, jump up at the crab's head once it's exposed and hit the Double Attack button (default L2 for PS2 or V for PC). If the energy field generated by Zero touches the head, you'll perform the attack which will easily finish it off. Grab the Metals it spews out and move on.  At this point Axl will leave, but you'll be fine with Zero alone. Across the rocky plateau slash at the Metools and bulldozer Reploids three times each to break through their barriers. Beyond here you'll reach a large building with a sealed door. Alia will tell you to use Zero's double-jump, so use it to reach the platform above. Take on the large bee guarding the door ahead, dodge its energy balls and attack away. At this point Axl will leave, but you'll be fine with Zero alone. Across the rocky plateau slash at the Metools and bulldozer Reploids three times each to break through their barriers. Beyond here you'll reach a large building with a sealed door. Alia will tell you to use Zero's double-jump, so use it to reach the platform above. Take on the large bee guarding the door ahead, dodge its energy balls and attack away.Go inside the building and get ready to face waves of bees. Slash your way through all the waves and grab the items that appear. Head right and you'll find a long corridor where X will rejoin the group. With X in command, proceed right and use charged shots to break through the barriers of enemies along the way (Alia will inform you how each Hunter can break through enemy barriers). Descend the wide shaft you'll eventually find and head right. Take out the enemies down the narrow corridor to locate a blue switch in a dead-end. Shoot the switch and a section of the ceiling above will open up revealing a tall shaft. From here you can head back to the first tall shaft and ascend to the top to find a room with two red Metals, with them in hand climb up the narrow shaft above the blue switch but watch out as the walls will close in on you. Quickly ascend the shaft and head right. In the next final room you can score another red Metal and a full energy refill by hitting the switch up in the top right corner to access the alcove. Once you're ready, head right to face the final Crab Mechaniloid of the stage. Intermission This Intermission will see you trapped in front of the cascading waterfall in Noah's Park (where you fought one of the giant crab mechaniloids). You'll be assaulted by waves of small crabs and bouncing wheels from every direction, including a rogue flying claw. Two numbers appear up on the right, the top indicates your top score for the mission while the lower records total enemy defeats of the current session. Watch out when the claw flies in, after streaking away once it'll fly up out of the screen after passing over your character and come straight down, so stand well clear of the area where it took off to avoid a beating. Eventually all the enemy types will attack at once while the claw flies in and out, so keep yourself moving while attacking. The Hermes Armor's Body Parts H allows you to avoid any kind of damage from the small crabs and bouncing wheels, giving you a great chance of racking up huge scores in the hundreds. |
| Mission select | ||
|---|---|---|
| 1. Noah's Park 2. Booster Forest 3. Troia Base 4. Pitch Black |
5. Primrose 6. Metal Valley 7. Dynasty 8. Central White |
9. Inferno 10. Jakob 11. Gateway 12. Sigma Palace |